Getting started
Set up your menu, choices and recipes
Build your product list, add choices like size and add-ons, then link recipes so every sale deducts stock automatically.
6 min read · Updated August 27, 2026
This guide covers the first thing to do after creating your account: getting your menu into Kasenso so the POS screen matches what you actually sell. Budget about twenty minutes for a menu of thirty items.
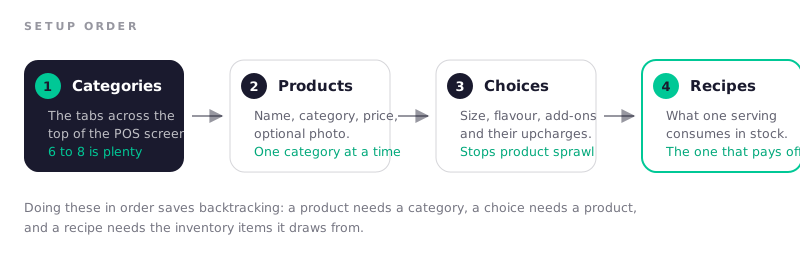
You will do it in four passes — categories, then products, then choices, then recipes. Doing it in that order saves a lot of backtracking.
1. Create your categories
Categories are the tabs across the top of the POS screen, so they should match how your staff think during a rush, not how a menu card is laid out. Rice Meals, Drinks, Add-ons, Desserts works. Bestsellers does not — an item can only live in one category.
Go to Menu / Product → POS Categories and add them in the order you want them to appear. Put the category you sell most from first; it saves a tap on every order.
2. Add your products
For each item under Menu / Product → Add New Product, fill in:
- Name — what the cashier looks for. Match how staff say it out loud.
- Category — from the list you just built.
- Price — what the customer pays, tax included.
- Photo — optional, but it measurably speeds up new staff.
Work one category at a time. It is faster, and you are less likely to end up with three slightly different spellings of the same drink.
3. Add choices for variations
A choice is a question the cashier answers when adding the item — size, flavour, spice level, add-ons. This is the part that stops your product list from exploding into forty near-identical entries.
If you sell milk tea in three sizes with four flavours, do not create twelve products. Create one product with two choice groups:
| Choice group | Options | Price effect |
|---|---|---|
| Size | Regular, Large, Jumbo | +₱0 / +₱20 / +₱35 |
| Flavour | Wintermelon, Taro, Okinawa, Matcha | +₱0 |
Each option can carry its own price adjustment, so Large adds ₱20 without you maintaining a separate product. One entry to update when prices change, instead of twelve.
A good rule: if the thing changes the price or the stock used, it belongs in a choice group. If it changes neither, it is probably just a note on the order.
4. Link recipes so stock deducts itself
This is the step people skip, and it is the one that pays for itself.
A recipe tells Kasenso which raw ingredients one serving consumes. Under Inventory, add your raw items first — chicken by the kilo, rice by the sack, cups by the piece. Then open a product and add its recipe lines:
- Chicken — 0.25 kg
- Rice — 0.15 kg
- Container — 1 pc
- Sauce sachet — 1 pc
Now every sale of that dish deducts those quantities automatically. You get three things for the effort:
- Live stock levels without counting, and a warning before you run out mid-service.
- A real food cost per dish, which is what tells you whether your price works. The menu pricing guide walks through that arithmetic.
- Wastage that shows up, because the gap between what the recipe says you used and what is actually on the shelf is measurable.
Include packaging in the recipe. Cups, lids, bags and utensils are real costs and they run out at the worst possible moment.
5. Check it on the POS screen
Open POS and run a few orders as if a customer were in front of you. You are checking three things:
- Everything you sell is reachable in two taps or fewer.
- The choice prompts appear in the order a cashier would ask them.
- After a test sale, the ingredients dropped in Inventory.
If a common item takes more than two taps, move it to an earlier category. That small change compounds over a few hundred orders a day.
Take something off the menu for a while
A dish runs out, a supplier lets you down, or an item is seasonal. Switch the toggle next to it on the Menu page and it disappears from the register immediately — on every device, without anyone restarting anything.
The product is not deleted. It keeps its price, its recipe and every sale it has ever made, so your reports for last month stay correct. It shows as Hidden on the Menu page, and the same toggle brings it back.
Two things to know before you use it:
- It hides from your online store too. One switch, both counters — a customer cannot order online what your kitchen cannot cook.
- A bundle does not check its items. If you hide a product that is inside a combo, the combo still sells and still deducts that product's stock. Hide the bundle as well.
Use this rather than deleting. Deleting a product to clear it off the screen takes its history with it, and next month's comparison quietly loses a column.
Common mistakes
- Too many categories. Six to eight is plenty. More and staff start hunting.
- Choices as separate products. The reason to use choice groups is that one price change updates everything.
- Recipes without packaging. It is the most-forgotten cost and it is entirely predictable.
- Recipes in the wrong unit. Pick one unit per ingredient — kilos or grams, not both — and stay with it. Mixed units are the usual cause of stock counts that drift.
Frequently asked questions
How many products should one category hold?
Enough that the category is worth a tap, few enough that nothing needs scrolling — roughly eight to twelve on a tablet. If a category runs long, the fix is usually a second category rather than a longer grid.
Can one product appear in two categories?
No. A product belongs to exactly one category, which is why categories should mirror how staff think during service rather than how a printed menu is laid out. A "Bestsellers" tab cannot work for this reason; put your best sellers first inside their real category instead.
What is the product code for?
It is a short identifier, up to four characters, that appears on receipts and in reports. It is optional, but it makes a printed receipt much easier to read back against a report line when you are reconciling.
Do I have to add recipes?
No — you can sell perfectly well without them. What you lose is automatic stock deduction, a true cost per dish, and any measurement of wastage. Most shops add recipes to their top ten sellers first and fill in the rest over a week.
Should I delete a product or hide it?
Hide it, unless it was a mistake. Hiding takes it off the register and your online store while keeping its price, recipe and sales history, so your reports still add up for the months it was selling. Delete only something that never should have existed.
What happens if I change a product's price later?
Nothing retroactive. Past orders keep the price they were sold at, so your history stays honest, and every sale from that point forward uses the new price. The same is true of recipe changes and costs.
Next steps
Set up choices for sizes and add-ons, then staff accounts and roles so cashiers only see what they need. If you get stuck anywhere, send us a message.