Getting started
Getting started with Kasenso POS
Create your account and get from an empty dashboard to your first real sale in about an hour, in the order that avoids backtracking.
5 min read · Updated August 27, 2026
Kasenso is a free cloud point-of-sale for small shops, restaurants and stalls. It runs in a web browser and as an Android app, the two stay in sync, and the free plan does not expire. This guide is the map: what to set up, in what order, and roughly how long each part takes.
Budget about an hour for a shop with thirty products. You do not have to finish in one sitting — everything saves as you go.
What you need before you start
- An email address for the owner account.
- Your product list with prices. A photo of your menu board is enough.
- A tablet, laptop or Android phone. Any of them works; a 10-inch tablet is the most comfortable at a counter.
- Optional: a 58mm or 80mm Bluetooth thermal printer, if you print receipts.
You do not need a card reader, a contract, or a per-terminal licence.
Create your account
Go to kasenso.com and choose Start Free. Sign up with the email that should own the business — this account becomes the admin, the only role that can see settings, staff and money reports. Use an address you will keep; it is what account recovery runs through.
The first account you create is the business. Staff accounts come later, and you create them from inside — staff never sign up for themselves.
Set up in this order
The parts depend on each other, so the order genuinely matters.
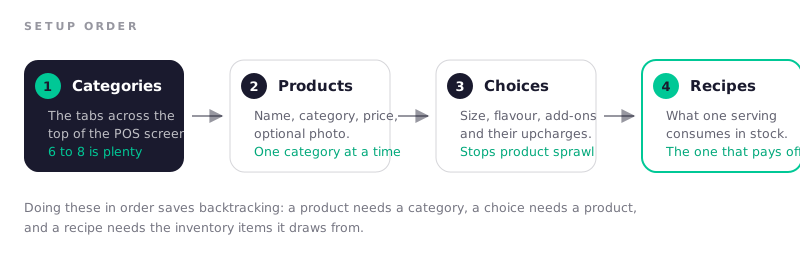
- Menu, categories and products — what you sell and what it costs the customer. Longest step, about 20 minutes for 30 items.
- Choices — sizes, flavours and add-ons — the variations a cashier picks at the till, so one product covers twelve combinations. 10 minutes.
- Inventory and recipes — raw ingredients, then which ones each dish consumes, so stock deducts itself. 20 minutes, and the step that pays for itself.
- Business settings — your name and address on the receipt, tax, service charge, order types. 5 minutes.
- Staff accounts and permissions — cashier logins that only reach the pages they need. 5 minutes.
You can sell after step 1. Steps 3 to 5 make the numbers worth reading.
Find your way around
The dark sidebar on the left is the whole application. On a phone the same things live in the bottom bar.
| Where | What it is for |
|---|---|
| Dashboard | Today at a glance — sales trend, top sellers, low stock |
| Point of Sale | The till screen your cashiers live in |
| Menu / Product | Your products, prices and categories |
| Choices | Sizes, flavours and add-ons, with their upcharges |
| Discounts | Preset promos the cashier can apply at checkout |
| Inventory | Stock levels, costs, wastage, recipes |
| Suppliers | Who you buy from |
| Staff | Accounts, roles and page access |
| Customers | Buyers from your online store |
| Expenses | Rent, utilities, salaries and other overheads |
| Reports | Sales, profit, and the Manager's Daily Report |
| Analytics | Trends and forecasting |
| Price Lab | Model a price change before you make it |
| KAISHA | AI marketing assistant |
| Settings | Business identity, receipts, tax, backups |
Cashiers see a much shorter version of this list — only the pages you tick for them.
Take a test sale before opening
Do not let the first real customer be the first order the system has ever seen.
Open Point of Sale, start a shift with a float of zero, ring up one of everything, pay it as cash, and print or preview the receipt. Then check three things: the receipt says your business name, the ingredients dropped in Inventory, and the sale appears in POS → Daily Sales. Void the test order afterwards so it does not pollute your first day of figures.
That five-minute rehearsal catches almost every setup mistake worth catching.
What it costs
Nothing. Everything above is free, permanently, with no card on file: the point of sale, shifts, inventory with recipe deduction, wastage, unlimited staff, on-screen reports, offline mode, and Bluetooth receipt printing on Android.
The Cool Features are included too — the Kitchen Display, CSV export, advanced analytics, the online store and customer database, automated daily report emails, Price Lab and KAISHA. See pricing for the full list.
Frequently asked questions
Is Kasenso POS really free?
Yes. It does not expire, needs no credit card, and has no per-terminal fee. Every feature is included, the Cool Features among them — there is no paid tier to move onto.
Do I need internet to use Kasenso?
Not continuously. You need a connection to sign in and to sync, but the till keeps taking orders when the signal drops and uploads them once it returns. See working offline.
Can I use Kasenso on a phone as well as a tablet?
Yes. Kasenso runs in any modern browser and as an Android app, and the same account works on all of them at once — a tablet at the counter and a phone in the kitchen, for example. The data is the same because it lives in the cloud, not on one device.
How long does setup actually take?
About an hour for a thirty-item menu, including recipes. If you only enter products and prices and skip recipes for now, twenty minutes is realistic — and you can add recipes later without redoing anything.
Can I import my products from a spreadsheet?
Not yet — products are added through Menu / Product → Add product. For a menu of any normal size this is quicker than it sounds, because you work one category at a time. If you have hundreds of items, contact us and we will help you load them.